Thursday, January 10, 2013

Green Juice

I was so excited when my husband gave me a juicer for Christmas. I have always wanted one but never committed. Since Christmas I have been trying to juice everyday and WOW do I love it!I wanted to quickly share the recipe I have been using because it is easy and tastes good too! I will write more later on why I chose juicing and the benefits I am seeing. 


This is my go-to bunch!
First I get all my produce out and wash it. Be sure to read your juicer's manual to see how they recommend preparing the items. My juicer is pretty heavy duty and it says I can throw whole apples in but I need to take the rind off my orange. 
 
 Isn't she beautiful!
 
This recipe yields about one 8oz glass of juice.
 
 
  • One handful of kale
  • One handful of spinach
  • 1-2 sprigs of parsley
  • 2 slices of ginger root
  • 1/2 a cucumber
  • 1 apple (I prefer Granny Smith)
  • 1 orange
  • 2-3 whole carrots 
 Now this is just a basic recipe, I have also added banana, mango, pineapple, and broccoli stems. Keep it simple and fresh, I enjoy using fruits and vegetables that are in season. As I experiment more I will add new recipes. Happy New Year!


Sunday, December 30, 2012

Matching game

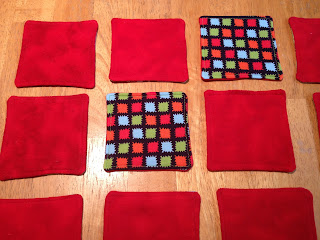
This fabric matching game is a great scrap buster! 


I have been sewing for my nephew since he was born (now 2 1/2) and I always save my scraps. I decided this year for Christmas to make him a matching game. I got the idea from one of my favorite blogs, The Cottage Home. Click here for her amazing tutorial.
I chose 10 different fabrics and cut 2  4.5" squares from each so that I had 20 squares (2 of each design)
I chose a simple red flannel for the backs and cut out 20 4.5" squares 

Next I cut 20 4.5" squares of batting, I used a very thin, fusible type. I ironed the batting onto the wrong side of the printed squares. Then placed the flannel and print on top of each other with right sides together. Stitch around the outside leaving a small opening to turn right side out. After all the pieces are sewn clip the corners and turn right side out. I wished I would have taken pictures of these steps, again see the other tutorial for a better description. Once all the squares are turned right side out sew along all four sides making sure to close the opening. 


I even made a little bag so he can keep them together and carry them around.


Monday, December 24, 2012

Jewelry Organizer


I have jewelry everywhere! In drawers, on my dresser, in boxes, in bags! Every morning when I am getting ready for work I always grab the same three pieces, why? Because they are on the night stand and I don't have to look for them...convenience. After my mom passed away I inherited her jewelry and I really loved some of the pieces, so it was time to get organized. I must say, I am addicted to Pinterest so I began to look for some ideas. I found a lot of pictures but no tutorials. So I will share with you what I made.

I went through the bags set to go to Goodwill and retrieved old picture frames.


Our bedroom is blue and brown so I chose Americana's French Grey Blue.


I did a quick sanding of the frames and then painted them all. I decided to use paper sacks as my backing because I like the look and it is a great way to recycle. I just went through my sewing stash to see what I could find, I wanted to by nothing for this project. I found two different laces and a cotton fabric that I liked. They were all white to begin with, but that was too bright for me. I decided to dye them!
I boiled some water in a small pot on the stove then added three tea bags to the water. I turned off the burner and I let the tea steep for 10 minutes. I removed the tea bags and added the pieces I wanted to dye. There is no science to the timing, I just kept checking them until they were the color I wanted. I rinsed the pieces in cold water and hung them up to dry.


I have always loved this quote by Coco Chanel so I had to include it!


When it came time to assemble I chose the tallest to add the lace to for my earrings. The two frames with the flat surface made a great place to screw in hooks to hold necklaces. Lastly I added a long piece of lace to hold some bracelets.


The positioning on the wall could have been better, but hey I'm no professional. Here is the finished product and I am proud to say I have varying my jewelry every day.


Tuesday, February 14, 2012

Clothespin organizer

Happy New Year!
(ok, I'm a little late)
But it is a new year and with that comes a renewed desire for organization. My personal desire for organization and less wasted time led me to create these super-cute clothespins. 
Every morning I stand in front of my closet and try to figure out what to wear. When I finally pick something I ask, "Did I just wear this?" Well no more! I think some mom's out there can also see this struggle with kiddos every morning. I decided that on Sunday I would pick out my clothes for the week, label them with clothespins and be done. Imagine what I could do with all that time saved every morning. Here's my closet all ready to go and after that is the tutorial on how to make these beauties!
 Cute right?!

Here's what you need:
5 clothespins
Paint and a paintbrush
Scrapbook paper
Wooden letters
Glue gun
Modge Podge (or make your own)
 First I painted all my clothespins yellow, then I painted the letters black and yellow.

Once the clothespins were dry I used two different designs of scrapbook paper to decoupage the pins. Modge Podge is great but if you don't have any just mix glue and water like I did. 

Once the paper is dry on the clothespins use a glue gun to glue the letters for the days of the week to the end of each clothespin. 

After all this was done I chose to coat everything with a glossy top coat to give it some shine!

So get out there and make them for your whole family!


Monday, January 2, 2012

Crock Pot Apple Butter

Growing up in Ohio apple butter was a staple in our home. In Los Angeles it is much harder to come by. So I decided while I was off work for Christmas to make my own. It was so much easier than I imagined and it made the place smell great! This recipe isn't set in stone so feel free to play around with it. Here's what I did:
Ingredients
4.5 lbs of apples (I used gala, and granny smith)
1 tsp ground cloves
1 tsp nutmeg
2 cinnamon sticks (I used some ground cinnamon too)
1/4 tsp salt
7 Tbs sugar (to taste)

First peel all the apples and then core. If you have one of those nifty machines then this will be a breeze for you!


Put all the chopped apples into your crock pot. Add nutmeg, cloves, cinnamon sticks, salt and 3Tbs sugar. Turn the crock pot to high and cook for 1 hour, covered, stirring occasionally. After the hour turn to low, keep covered and let it go.
I checked mine after four hours, and did a taste test. I stirred it and added 2Tbs of sugar and 1 tsp of ground cinnamon. Then recovered and left it. Six hours later I checked again and tasted again. I took out the cinnamon sticks and added the last 2 Tbs of sugar. By this time the apples were cooking down nicely but still very coarse. Feel Free to check and stir as many times as you want! I stirred more than I am documenting, just because I was curious. This was the point I went to bed. Guess I forgot to take pictures of it cooking, oops.
Next morning everything still looking good but I wanted it to cook down some more. 15 hrs after the last check (when I took out the sticks) I took off the lid and turned it to high to cook off some of the extra liquid and thicken it up. During this time I used my silicone whisk to smooth it out even more. After 2 hours on high I turned off the crock pot and used my Cuisinart mini prep to puree the apple butter, since I like mine smooth. Now, I canned mine but if you plan to eat it soon or give it away you can just put it in containers and store in the fridge. Mine made enough for three jars plus a little extra to use now. Here is a quick breakdown of cooking times:
Cook time
1 hour on high
4 hours low and check
6 hours low and check
15 hours low and check
2 hours uncovered on high
total cook time: 28 hours
Enjoy!

Friday, December 23, 2011

Grout Cleaner

I, unfortunately, live in an apartment. But, this is LA so I know I'm not alone. Don't get me wrong I LOVE our place! We have turned it into our home and it feels like so cozy and inviting every time I walk through the door. A problem area for me when I am cleaning is all the tile and the grout that comes with it. Now most of you are picturing your beautiful floors, but mine is on my kitchen counters! Needless to say they begin to look dirty and I haven't found a cleaner I like, until now. With the holidays here I needed a deep clean in my kitchen before guests arrive. After searching the web I came across many people recommending a natural cleaner which I am all for! This may be old news to some of you, but I want to share my experience with using vinegar and baking soda! Please do not judge me but here are my counters:


Not pretty, I know. Here is what you will need:
  • Small Glass Bowl
  • Old Toothbrush
  • Baking Soda
  • Vinegar
  • Clean Sponge or Rag
Begin by mixing baking soda and vinegar together until it forms a paste. Use the toothbrush to work the paste into the grout.
Allow this to sit for some time, I kept it on for at least 30 minutes while I tackled other rooms.
Now comes the work part. Use toothbrush to scrub the grout lines, rinsing the toothbrush often. Did I mention elbow grease in the supply list? I immediately saw a difference! Once you complete a section of counter (or floor) use a damp sponge or rag to clean of all excess paste. Now you are left with gleaming counters! (or floors!)
Not the best pictures, but wow! what a difference it made.

Monday, November 28, 2011

T shirt necklaces

T shirt necklaces seem to be popping up all over, and I love them! I have been making these for some time now and I have so much fun creating new styles. Here are a few samples of what I have done.
 These and other styles of mine can currently be purchased at:
Free Bird Boutique
3412 1/2 W. Magnolia Blvd. 
Burbank, CA 91505
and,
 Diana's Boutique
4334 Tujunga Avenue 
 Studio City, CA 91604